Hi All,
recently Microsft published a list of video encoders tested for Live streaming with Microsoft Stream (http://bit.ly/LiveEnc).
One of this products is OBS Studio, a free and open source software for video recording and live streamig (https://obsproject.com/).
This is a great news and big improvement on live events direction compared to Skype for Business.
This area (meetings, meetings recording and live events) is definitely the one that I love in Teams (in conjunction with Stream).
Note: before you go on, it’s a good idea to read this article to understand differences in Live events between Teams, Stream and Yammer
Live events across Microsoft 365 in Yammer, Microsoft Teams, and Microsoft Stream
In this article you will find:
– Live Events with Microsoft Teams
– Live Events with Microsoft Stream
– OBS Studio setup
– OBS Studio streaming
Other articles on OBS Studio you can find interesting:
How to use OBS Studio as an external encoder for Yammer Live Events
How to use OBS Studio as a virtual webcam source in Teams and Live Event with NDI Tools
Live Events with Microsoft Teams
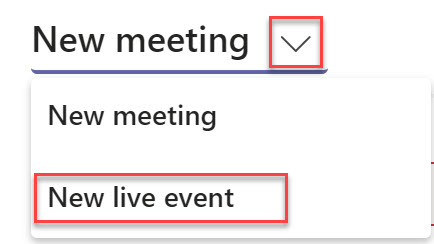
- Click on Meetings tab -> Schedule a meeting

- Be careful to click on the arrow to open the meeting type window and choose New live event
- Fill meeting informations and click Next

- Now you have to choose Live event settings.
These are the default settings, Org-wide and Teams as producer

But we want to use an external encoder like OBS Studio, so we need to change the production type to External encoder.

Note: doing that will greyed out the Public option.
This table show you why: Who can watch live events?

- Meeting is ready and published in Stream.
Click Join to start the pre-live setup

- When you join the live meeting you will see a window like this one.
Note that the meeting is powered by Stream, that you are Offline and follow the instruction on the left.
First of all you have to click Start setup to prepare the live meeting

- Wait few seconds…

- Now the live meeting is ready to accept incoming stream from your external encoder (OBS Studio in this article).
Note that you are now in Pre-Live status.
Copy the Server Ingest URL on the right, we’ll use it with OBS Studio later

Live Events with Microsoft Stream
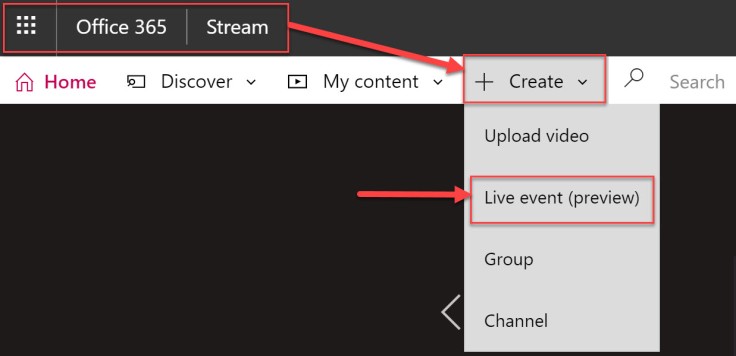
- Go to Office 365 Portal and open Stream.
Click on Create -> Live event
- Fill meeting informations and click Save

- After the event is saved, you will see the informations to send the stream from an external encoder. In Select encoder choose Configure manually because OBS Studio is not listed (yet).
Note also that the Live event is saved but not published. Click on Publish now to set the event public to your Company.To go in Pre-Live status click on Start setup.
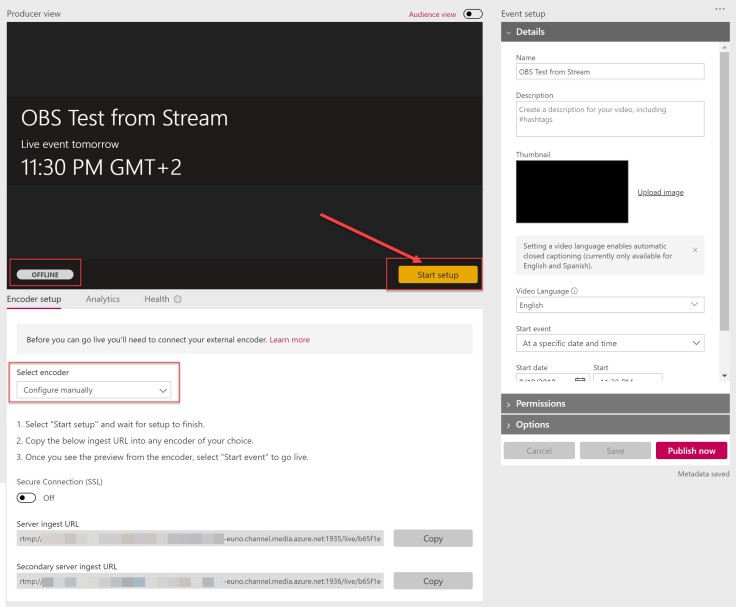
- Few seconds after, the live event is ready

- Now you are in Pre-Live status.
Copy the Server Ingest URL, we’ll use it with OBS Studio later

OBS Studio setup
As said before, OBS Studio is a free and open source software for video recording and live streamig, you can download it from the official site https://obsproject.com/download
First of all, there is a Portable Edition (in my utopian world every program should be Portable!), plus the program is free, plus there are many plug-in (https://obsproject.com/forum/resources/), and last but not least it’s very stable, I’ve used it during many tests without any issue.
It’s important to understand that this article is not a guide to OBS Studio (I’ll write other article on this program in the future), I’ll give you only the basic informations to start sending video streams to Teams and Microsoft Stream.
OBS Studio first impression is a bit “hard”. This is the main window
In this article I’ll add few sources to compose the video layout.
Desktop with PowerPoint presentation
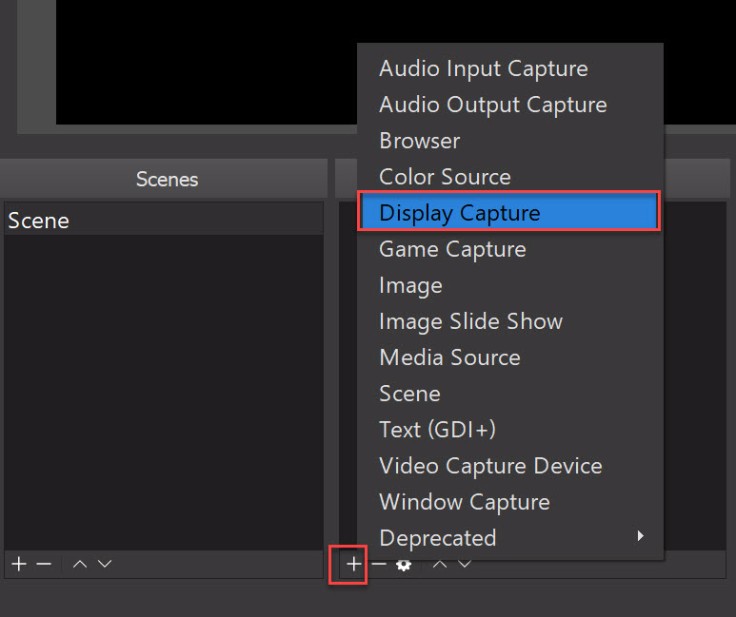
- In Sources click on the + icon -> Display Capture
- Select Create new then inser the name of the source (for example Display 2)

- Choose the correct display where PowerPoint is open

- The new Dysplay 2 source is placed in upper-left corner.
To crop the area hold the Alt key and drag the bounding box.
The edges will change to green to show it’s being cropped

Drag the bounding box to resize
Video capture device(s)
- Now add two different cameras.
In Sources click on the + icon -> Video Capture Device

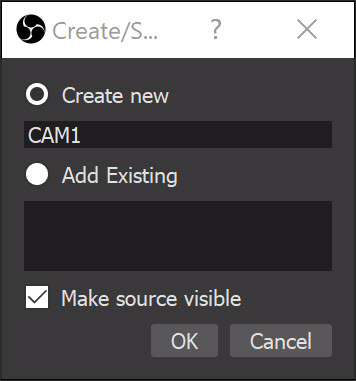
- Select Create new then inser the name of the source (for example CAM1)
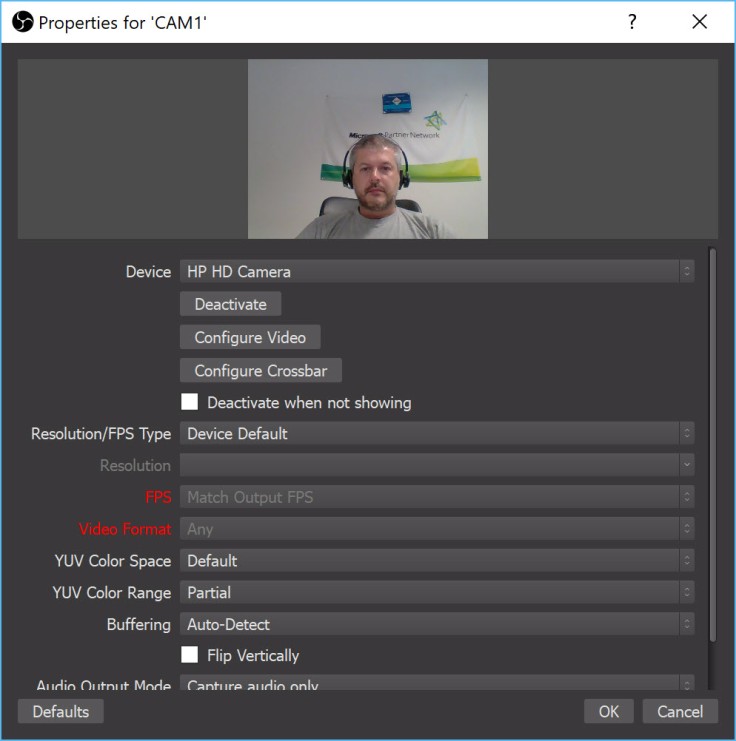
- In Device choose the right camera
- Repeat this step to add a second camera attached to the same PC.
In this example I have a Logitech Rally Camera connected to my laptop
- Place CAM1 and CAM2 where you want on the scene

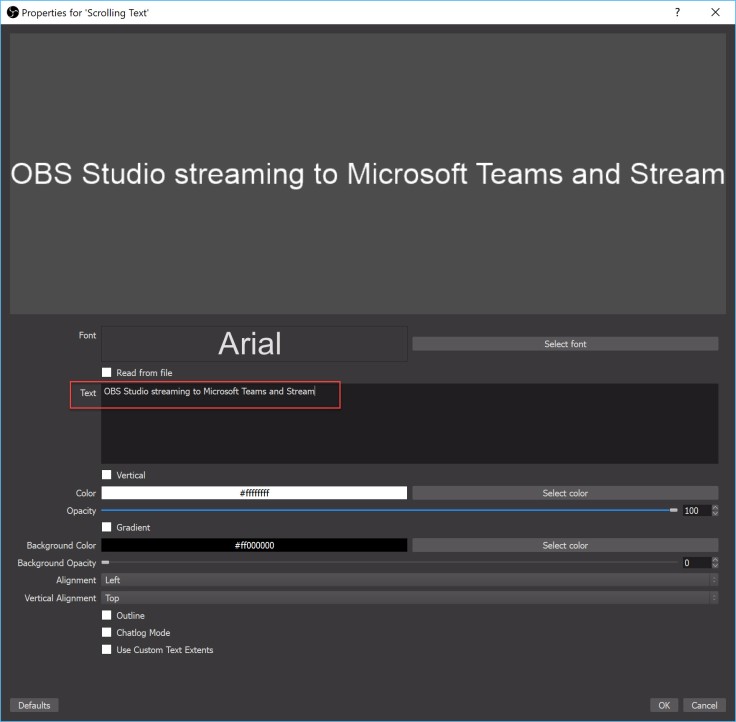
Scrolling text
- To finish the scene composition, we can add some scrolling text, just to show you how powerful is OBS Studio
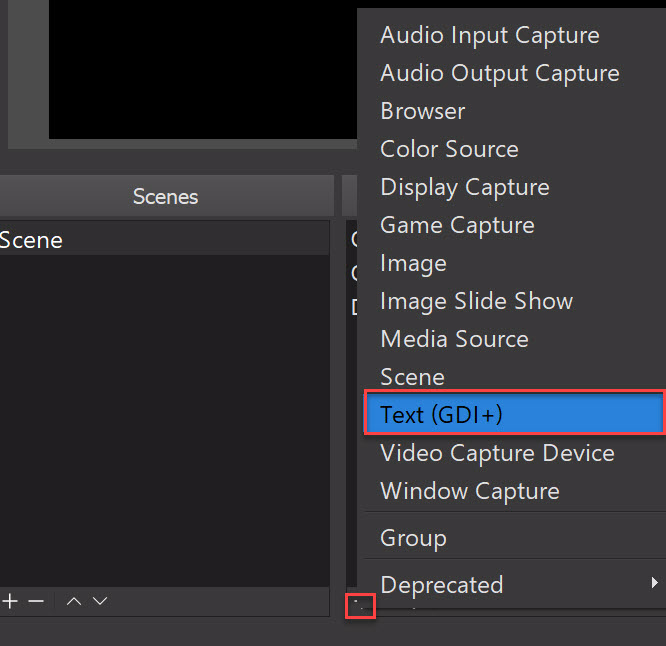
In Sources click on the + icon -> Text (GDI+)
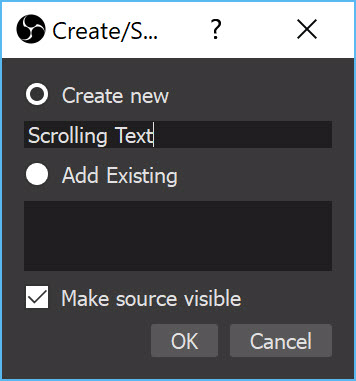
- Select Create new then inser the name of the source (for example Scrolling Text)
- Insert the text you want than click OK
- Select the new source, right-click on it then select Filters
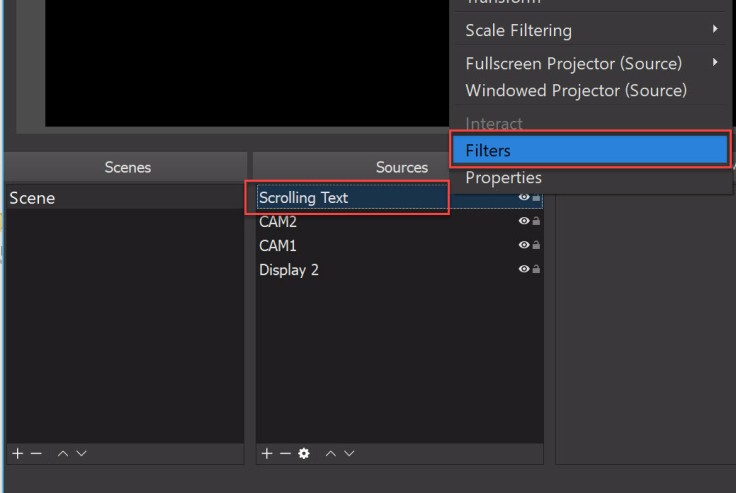
- In Effect Filters click on the + icon -> Scroll

- Choose the Horizontal Speed you prefer, then click Close

- Place and resize the scrolling text object where you want
The scene should be something like this one.

OBS Studio streaming
Now the final step, configure OBS Studio to send the video stream to Microsoft Teams or Microsoft Stream (the process is the same).
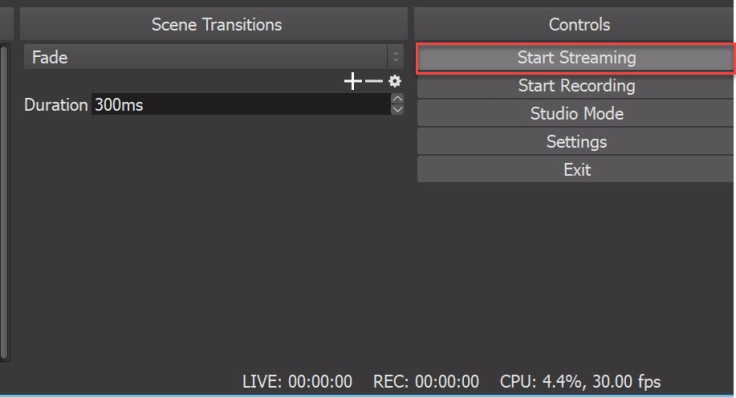
- In Controls click on Settings
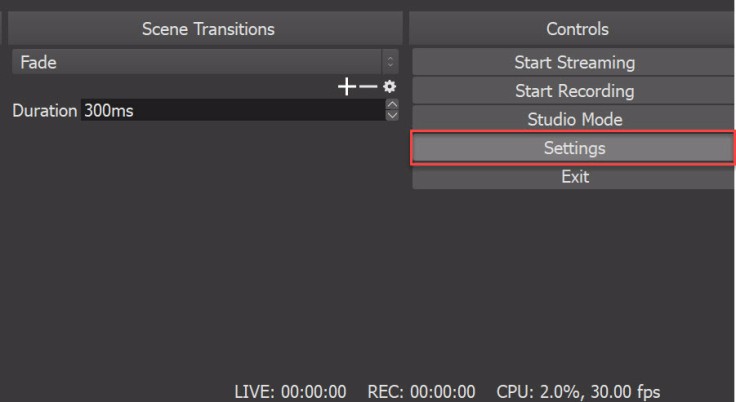
- Select Stream, then Custom Streaming Server in Stream Type

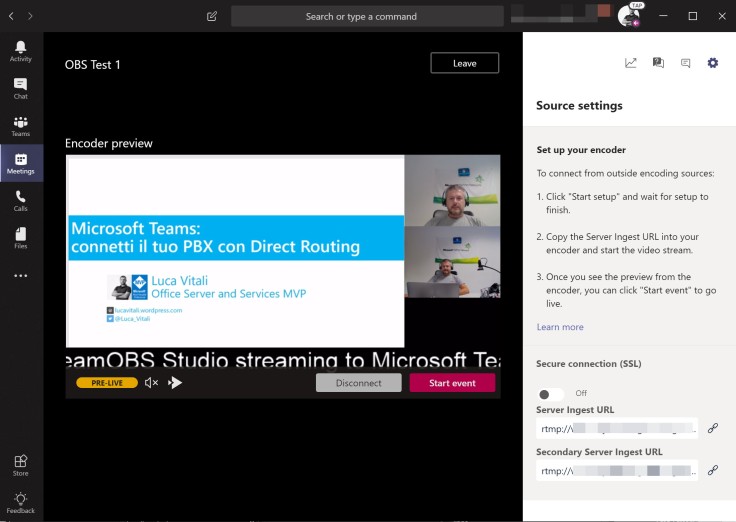
- In Microsoft Teams copy the Server Ingest URL
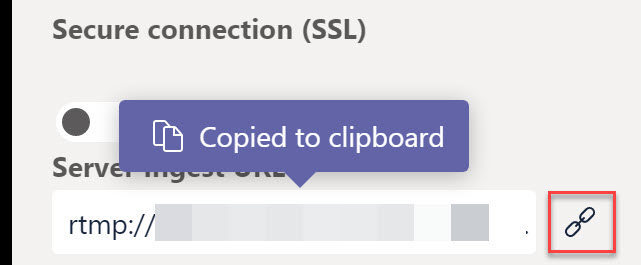
If the Live Event is created in Stream, copy the Server Ingest URL from Stream

- Paste the Server Ingest URL in OBS Studio Settings
Make SURE you enter something as Stream key, it’s not important what you enter, a random numer is perfect, but is MANDATORY to add something here, then click OK
- Click Start Streaming in Controls to start video output to Teams or Streams
- After few seconds you will start to see the video stream from OBS Studio in Microsoft Teams
This is the same in Microsoft Stream (with a different Server Ingest URL)

That’s all. Enjoy streaming!
Other articles on OBS Studio you can find interesting:
How to use OBS Studio as an external encoder for Yammer Live Events
How to use OBS Studio as a virtual webcam source in Teams and Live Event with NDI Tools
Best Regards
Luca

Nice article Luca. Have you published an article on NewTek NDI as mentioned at the end of this article?
LikeLiked by 1 person
Not yet, I’m sorry. It’s in the to-do list…. 😦
LikeLike
Thank you Sukanta
LikeLike
I would love to see NDI supported as a source in Skype for Business as it is in other flavors of skype. – Thank You! Mike
LikeLike
Hi,
I’m trying to tun OBS with microsoftstream but keep on getting error “invalid path or connection url” what can be the issue?? I’ve added admin authentication to the stream settings… can it be it just takes time from when I create an even until I can access it via OBS?
Thank you
LikeLike
Hi Chani,
have you created a private or public (anonymous) Live Event?
Because you cannot use (at this moment) an External Encoder with a public Live Event.
The RTMP link is immediate, have you entered the random Stream Key in OBS?
Regards
Luca
LikeLike
Thank you so much, how do I know if it’s a private or public event? I created it while logged onto microsoftstream through create live event
LikeLike
You choose it during the Live Event creation wizard. You need to choose Org-Wide to have External Encoder available. Please read carefully my guide above to check every step.
LikeLike
Very helpful thanks for sharing how you solved this problem!!!!
LikeLike
Hey Luca,
Thanks for detailed explanation.
But I am getting below error when I put any random number as Stream Key.
Can you please advise what can be the issue?
“Could not access the specified channel or stream key, please double-check your stream key. If it is correct, there may be a problem connecting to the server.”
LikeLike
Hi Ganesh,
nice to be helpful. I’ve made a test with latest OBS Studio (24.0.3) and Stream Live Event without any problem. I’ve entered 12345 as Stream Key. Please double-check every steps above.
Best. Luca
LikeLiked by 1 person
Thank you so much! This was so helpful as I was confused as to which to put in the stream type, URL and stream key. Your post has all the answers! Thanks again!
LikeLiked by 1 person
Hi , Thank you . I can able to do live streaming and working fine .
Once again Thank you 🙂
LikeLiked by 1 person
I have to make lessons on line using Microsoft Teams and I need to use a DSLR camera as a webcam. This is why I found this article very interesing. Unfortunately I have two setting problems. First problem. When I reach the “Informazioni per le dirette” window in OBS’ “Configurazione guidata automatica” I can’t go on because I don’t know which “servizio” to choose and overall I don’t have any “Codice delle dirette”. This means that if I don’t fix this I can’t use OBS at all. Second problem. The graphic organization of my Microsoft Teams version is different from yours so that I can’t access nor to “New live event” nor “New live event permissions” commands. Should I give up my project?
LikeLiked by 1 person
Hi Luigi,
about first question: which is your DSLR camera output? HDMI or USB? If you have HDMI output, you have to buy a HDMI to USB adapter, I suggest a BlackMagic Design ATEM Mini, it’s impressive and quite cheep.
About Live Event: Teams graphics is always changing, it’s nearly impossible to stay update. But if you DO NOT HAVE some features, it’s not a graphic change, it’s a settings issue. You have to ask to your O365 Tenant Admins to allow Teams Live Events for everyone in the Teams Admins Center.
Hope this could help. Best. Luca
LikeLike
Reblogged this on Il club delle 6.
LikeLike
Hi, Luca. Thanks for your great tutorial. I tried myself to stream OBS 25.0.4 (for Mac) on Microsoft Teams on my MacBook Pro. Everything seem to work, but when I copy-paste the Server ingest URL to the OBS Settings and Start streaming, the connection doesn’t seem to work: all frames get dropped and after some timeout Teams goes “There’s a problem playing the video. Please try again later. Try again/Report an issue (Error code 0x20400005)”
Note that OBS seems to be aware of the connection (when I Leave the event OBS gets noticed).
Any idea?
LikeLiked by 1 person
Hi Paolo,
I never tested OBS on a Mac, I’m sorry. It seems a Codec issue. I do not have any other hint to give you. Let me know please. Best. Luca
LikeLike
Hi Luca,I have the same bug inTeams as Pablo but I use OBS 25.0.8 in Windows 10
There are some settings that the administrator can make to prevent a stream.
OBS starts with the transmission but cannot deliver data.
Other Ideas?
LikeLike
Hi Jens,
It seems there are many issue in OBS for Mac v.24 and v.25. I’ve read many that suggest to use OBS v.23.
Let me know. Best. Luca
LikeLiked by 1 person
Thanks for the great post Luca. I am trying to use webcam feeds from 2 presenters on a Teams Live Event so they show up side-by-side. How do I get the live webcam feeds into OBS?
LikeLiked by 1 person
Hi Pablo, thank you. That way is not possible. You have to collect remote video to OBS (try https://obs.ninja) with the local video then inject the OBS output to Teams Live Event as a virtual webcam.
LikeLike
I was having problems with OBS Studio Mac (v25) and went ahead and tried v23 per your comment. Worked first time with that older version!!
LikeLiked by 1 person
Absolutely awesome tutorial! Can I just add, I was having an issue with the video not displaying in teams (teams encoder error error code 0x20400005). The issue turned out to be that it didn’t like the video resolution from my Surface Pro. I had to set the base (canvas) to 1080 X 1920 and the FPS value at 30 and boom, it all started working.
Thanks again for the detailed tutorial. Super work!
LikeLiked by 1 person
* To do the above, go to: Settings > Video > Base (set to 1920 x 1080) > Common FPS Values = 30
LikeLike
Thanks to you for sharing these information. Best. Luca
LikeLiked by 1 person
Hi when I’m setting up the live event I don’t see options available for Streams could you please help ?
LikeLike
Hi Thilina, could you please share some screenshot of your problem?
Have you followed every steps of the article?
Best. Luca
LikeLike
Great tutorial, thanks! It works great for video streaming and more but I am trying to figure out how to stream video sound as well. I don’t want to stream the system sound, only the sound included in a video. Any ideas?
LikeLike
Hi Christian, maybe you can use “Media Source” in OBS.
OBS -> Sources -> + to add a new source -> Media Source -> choose the video file. Let me know if this will help you. Best. Luca
LikeLike
I was having trouble with the connection timing out without displaying – similar to what Chani described. Based on the MS troubleshooting guidance (https://docs.microsoft.com/en-us/stream/live-event-troubleshooting), I needed to open ports to allow streaming. That fixed the problem for me. Maybe that will help others.
LikeLiked by 1 person
Thank you for sharing it!
LikeLike
Hi Luca, Thanks for this article. I am on Mac, and at the first attempt, just to create a new meeting, I don’t have any options that you show in your images (New Live Event). All I have is the name of the meeting, date and time, then Plan button. Is it because I have the free version of Teams? I want to know before I purchase Teams.
LikeLike
Hi Thierry,
To create Live Events you need an Enterprise License, like E1, E3 or E5. Live Events are not available on Business Plan or Free Plan.
LikeLike
And with a Live event, can I still have interactions with the people connected with me?
LikeLike
Live Event is designed to be a one-to-many communication, with a good Question&Answer tool that allow end users to send questions to the presenters and receive answers and messages.
LikeLike
Hi Luca, I purchased an enterprise Licence (E1), having issues to connect participants:
When I invite someone (I copied the ‘get attendee link’) they get this message (my translation from french) “Participation requires an authorization. Contact the organizer to get access to the live event”.
How can I make people join the live event ?
LikeLike
Hi Thierry, do you need to add someone as a Speaker into the Live Event or you just need to send the public invite to allow the end users to join the event?
LikeLike
The latter : I just need to send the public invite to allow the end user to join the event..
I invited myself on my Teams free account, and got the message above.
LikeLike
To Join the Live Event as a viewer, end users just need a link and a supported Browser, nothing more. They do not need Teams to view the event.
LikeLike
Ok, so why doesn’t it work for me ? I send the “get attendee’s link”
LikeLike
Hi Luca, now that OBS 26 has the virtual camera option, is this still relevant ? I tried the virtual camera with ZOOM, GOOGLE Meet and it works like a charm. Unfortunately it didn’t work with TEAMS.
LikeLike
Hi Thierry, thank you for this question. It’s still relevant because Virtual Cam feed video only, you cannot send audio to Teams in this way, so if you need to manage audio and video with OBS, you still need NDI. Anyway it’s strange you cannot use Virtual Cam with Teams, check it again, it has to work.
LikeLike